

What is the best pipeline for re-rendering a CAD assembly after a revision without redoing the whole scene?
Point the render scene at the CAD file instead of importing a second copy of it, and keep the work you actually spent time on, cameras, lights and surfacing, outside the CAD export so a revision only replaces geometry. The loop then runs re-export, reload the reference, check the parts that changed, render.
That much is settled. What is not settled is what keeps materials attached when the geometry changes, and getting that wrong is what turns a small revision back into a rebuild.
What the material match actually keys off
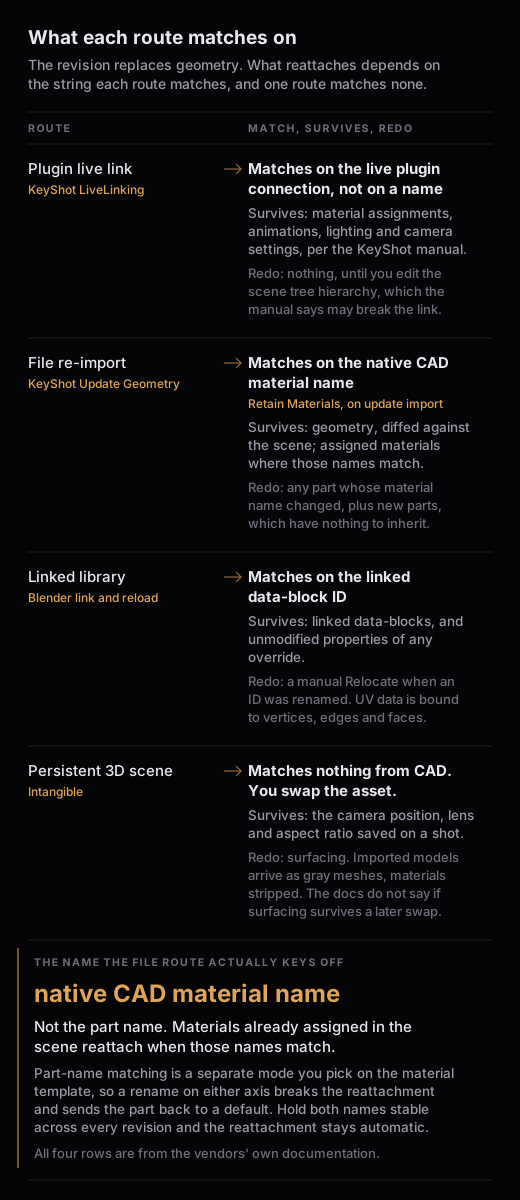
The reattachment is automatic, and it keys off a string your CAD export controls. KeyShot's Retain Materials option appears for Update and Add to Scene imports to ensure that materials already assigned in the scene will be applied to the new import if the native CAD material names match. Its material templates apply to the original material names of the parts, the names they had when the parts were imported from the CAD file. So the match key on that path is the native CAD material name rather than the part name. Part-name matching is a separate mode you pick on the template, and a rename on either axis breaks the reattachment.
What survives the export is a different question from what survives the import, and the neutral exchange formats are thinner than they look. Open CASCADE's STEP translator documentation states that only geometrical, topological STEP entities and assembly structures are translated by the basic translator. Names, colors, layers and validation properties come across through a separate extended data exchange layer instead. Its IGES guide says the same about entity attributes such as layers, colors and thickness, which are translated using that extended layer. Render materials, lights and cameras are on neither list.
On the CAD side those attributes are usually a setting rather than a default. PTC documents Creo exporting non-geometric data such as the display details of color, layers, and groups, material definition, name, and density. Those are options in the export profile rather than defaults, and material definition there means the engineering material rather than a render shader. Cameras are further out of reach still. An archived KeyShot manual listed camera import as available only for .fbx, .ma, .mb, .bip and .ksp, none of which are the neutral CAD exchange formats. Whatever your renderer knows about framing, the CAD file is not where it came from.
The revision loop, step by step
Re-export without touching names. The export is a manual step someone runs every revision. PTC's documented Creo path is File, then Save As, then Save a Copy. Watch the granularity too: PTC states that assemblies are exported to the STEP format as single files that include all the geometry of the assemblies by default, so exporting only the changed component is something you have to switch on first.
Reload the reference instead of importing again. Which control this is depends on the route, and the four common ones are compared below. The thing they share is that the scene stays open and the geometry is what moves.
Check the parts that changed, then the parts that are new. Verify that newly added parts inherit default or parent material assignments, then render. New parts are the ones with no prior assignment to reattach to, so they are where a silent default shows up.
Check the things that were never in the CAD file. Lights, environment and camera framing were not in the export, so they cannot have been broken by the export. They can still have been broken by the reload if the reload replaced the object those things were attached to. Look at one previously approved frame before you look at the new one.
Render. If your scene is already split into layers or passes, re-render only the product layer and composite it over the old background. If it is not, splitting it now is a judgment call, and layer setup pays off across a series of revisions rather than a single one.
Four routes to the same update, on the same criteria
| Route | What carries the revision | What the docs say survives | What it asks of you | Where it breaks |
|---|---|---|---|---|
| Plugin live link (KeyShot LiveLinking) | The modeling application pushes the updated model into the open scene | Material assignments, animations, lighting and camera settings | A supported modeling application with the plugin installed | Editing the scene tree hierarchy on the render side |
| File re-import with update (KeyShot) | A re-exported file, diffed against what the scene already holds | Geometry differences added and removed; assigned materials when the native CAD material names match | The same model imported into that scene at least once before | Parts renamed or geometry altered inside KeyShot |
| Linked library in a DCC (Blender) | A linked source file, pulled in on reload | Linked data-blocks, and unmodified properties of any override | The geometry living in a .blend file, so CAD needs a conversion step first | Renamed or restructured data-blocks in the source |
| Persistent 3D scene (Intangible) | Swap, which Intangible documents as an action on the imported asset, inside a scene that already holds the shots | Each shot's camera position, lens and aspect ratio | A conversion to an accepted mesh format, and surfacing done in the scene | Anything you needed the CAD export to carry, since materials do not survive import |
The plugin live link is the strongest option when your modeling application has a supported plugin and you can leave the scene tree alone. KeyShot's manual states that LiveLinking connects your modeling application with KeyShot Studio, and allows you to update the model inside KeyShot Studio without losing any material assignments, animations, lighting, and camera settings. That is a vendor claim about the intended path, and it is scoped to models sent through a plugin rather than to a file-based re-import of STEP or IGES. The same documentation warns that changing the hierarchy in the scene tree will affect LiveLinking and may break it. The structure the CAD side sends has to stay the structure the scene holds, which is a real constraint if your render scene wants a tidier hierarchy than engineering keeps. The plugin route also brings in more than geometry on the first pass: KeyShot's plugins manual says that depending on the application, the entire geometry along with its structure, color assignments and camera views can be imported. That is conditional on the application, and it describes the initial import rather than what persists through a later revision.
File re-import is the one that fits how models usually arrive: a supplier's STEP, a checkout from PDM, an export someone emailed. KeyShot documents an update choice on re-import, where it will compare the geometry with what is in the scene already, and remove or add the differences. It is available only when that model has been imported into the scene before. KeyShot also notes that if you have altered the geometry or renamed parts inside KeyShot Studio, this will have an impact on the ability to update the geometry. Read that as a caution rather than a prediction, since the wording names an impact on the ability and not a specific failure. When parts were renamed, check two things on the updated scene: that the geometry updated at all, and that the parts still carry the materials Retain Materials matches by native CAD material name.
A linked library is the strongest option when the render scene is a real DCC scene with shading, rigging and animation you would hate to rebuild. Blender's manual states that link creates a reference to data in a source file such that changes made there will be reflected in the current file the next time it is reloaded, and that in the Outliner's Blender File display mode you can right-click a linked blend-file and choose Reload to immediately update the current blend-file with the latest version of the linked data-blocks, without having to reopen the file. Local edits are handled by library overrides, where unmodified properties of the overridden data will be updated when the library data changes. The boundary is the format: linking runs between .blend files, so a STEP or OBJ assembly has to be brought into one before any of this applies to it. The fourth route in the table, the persistent 3D scene, works on a different footing, so it gets its own section below.
Where the shortcut breaks
A rename is the documented break, and vendors concede it in the shape of their repair tools. Blender's fix for a linked data-block that broke because the ID was renamed is a manual Relocate to another ID, from the same library or a different one. The same page limits that operation to data-blocks that are directly linked and not a dependency of other linked data, so it is a repair for one case rather than a general rename fix.
A structure change is the next break. Blender documents that relationships between linked data-blocks can change, resulting in outdated overrides that need to be resynced to match the new structure of their hierarchy, which happens automatically when a blend-file is opened. Automatic resync is the good case. The same page says manual resync is sometimes still needed.
Topology is the limit worth planning around, and it is the one no vendor states outright. The documentation only implies it: Blender states that every point in the UV map corresponds to a vertex in the mesh, the lines joining the UVs correspond to edges in the mesh, and each face in the UV map corresponds to a mesh face. A texture assignment sits on that correspondence, so a revision that changes vertices, edges or faces has changed the thing the assignment was bound to. That is a mechanism the documentation states rather than a measured result, and how much of it you feel depends on how much of your look is UV-mapped rather than assigned per part.
What changes when the scene is the persistent object
Every route above puts scene survival on discipline you maintain. Keep the names stable. Keep look-dev out of the CAD export. Keep the layers clean. It works, and it puts the load on an export behaving well every revision, forever, run by whoever is at the workstation that week.
The other construction is a scene that holds the shots independently of the geometry inside it, where the import is an ordinary object you swap. Intangible states that once imported, the asset behaves like any other library asset, with drag, swap, lock and attach an image reference. Intangible also states that a shot is a saved camera framing inside a scene, and each shot remembers its camera position, lens, and aspect ratio. On that account the framing is held by the shot rather than rebuilt per render, so the camera work never depended on anything travelling through the CAD export in the first place. Both are the vendor's own claims about the intended path.
Two limits sit on that, both first-party, and both are the kind of thing to know before you plan a revision loop around it. Intangible states that all imported models are stripped of their materials on import and arrive as gray meshes, which means surfacing is attached in the scene and nothing your CAD export carries about materials matters here. Intangible also states that USD and STL are not import formats, so an assembly handed over as STL needs a conversion step before it reaches the scene.
So the trade is legible, and it is a real trade. The naming-discipline routes carry material identity across the export and charge you with protecting names in CAD forever. The persistent-scene route gives up material identity at the boundary and puts the camera work somewhere the export cannot reach. Which one is right turns on one question: are your renders wearing materials assigned in CAD, or a look somebody built in the render scene?
A bracket revision, end to end
Engineering moves a mounting bracket and adds two holes. Nothing else in the assembly changes. On a naming-discipline route the sequence is: re-export the assembly with the same part names and the same export profile, reload the reference or accept the update prompt, confirm the bracket picked its material back up, then look specifically at the two new faces around the holes, because new geometry is the part with no prior assignment to inherit. Cameras and lights should not have moved. If one did, the reload replaced something they were parented to, and that is a scene problem rather than an export problem.
On a persistent-scene route the sequence is shorter and lands in a different place: convert the revised assembly to an accepted mesh format, swap the asset, and the shots you already framed are still the shots. The bracket arrives gray on that route, so the work you redo there is surfacing while the framing stays put. How often you redo it is unconfirmed: the documentation states that imports arrive gray, and does not state whether surfacing applied in the scene survives a later swap of the same asset. Neither version is free. Pick the one whose redo you would rather do on every revision for the life of the program.